I love soap. I have quite a collection but I use it mainly for decoration. Anything but the plainest of bars sets me on fire. This is my usual but it's no fun.
When I decided to make soap for Christmas gifting this year, I discovered a wonderful thing. Melt and pour base doesn't make me itch.
To be clear, let me explain that melt and pour is a simple soap made with lye that someone has already made for you. You get to melt it down, add your choice of additional ingredients and re-mold it into whatever shape you want. It's easy peasy pie.
For today's trial run I ground up some of the dried marigold (calendula) petals and infused them into some warmed olive oil along with a tiny bit of the tomato leaf fragrance oil. I also added some of the olive leaf powder to some melted coconut oil for a second, green layer.
As a base I chose goat's milk. Look at the oil slick it leaves on your hands. I wasn't too thrilled with that but until I get a bar in the tub, I don't judge.
I used my new little loaf pan and the heart mold. I was so happy that I remembered the alcohol for spritzing this time. The last time I soaped, I left it in the other room and that's a disaster. With melt and pour everything gets a quick spray to reduce bubbles and help layers stick together.
My first layer of goat's milk and the calendula infusion went well but then things got crazy. I am used to bases that set up quickly so I started to pour the second layer too soon and it went right to the bottom. Not good. I waited until it set up a bit and then tried again to get a clear green layer on. I wanted a bit of a swirl but not a complete mix. I am going to have to work on that timing thing. I finished the top off with some white base with a sprinkle of unchopped petals.
Since it was a cool day, I sat it all in the shade of the deck to harden. It didn't take long.
My two little leftover bars were the first out. I am going to use them for embedding in the future. That means I'm going to cut them up and add them to a clear base for fun.
The heart was ready next. Isn't it pretty? The mold was called Knitting Love so you know I had to have it.
I left the loaf to harden for about six hours before I tried to pry it out. I was nervous about it but it popped right out. Now you can see the three layers I had so much trouble with.
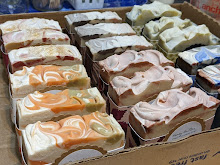
My next issue was in the cutting of the bars. I am glad that this was only a trial run and not intended for gifting because I made an awful mess of it. It was harder to cut through than I thought. I ended up with lopsided bars. I tried my ripple cutter and my straight cutter and they were both crooked. My fault, not the cutters. The Mister had used them for our Christmas coffee bars and they turned out fine.
Sloppy cuts aside, I really love it. I wanted a bit of a swirl effect and I got it thanks to my boo boo. The next time I won't try to be so precise. Soap happens. It smells absolutely wonderful. The best part? I've taken two baths with it and nothing is red, blotchy or itching. Crookedness aside, I'm declaring this a soaping WIN.


.jpg-large)


I'm so glad you found something nice that works for you and those bars look good. I have to use soap-free things to avoid itching and was so pleased the day I found one that didn't look medical :D
ReplyDeleteJust beautiful! I love the step by step pictures, we get to share the process and savor the results! Definitely a winner!
ReplyDeleteI love handmade soaps. Your bars look terrific and I bet the aroma is wonderful. The heart shaped bar is perfect for a knitter.
ReplyDeleteHow fun! You make it sound easy.... Love that heart-shaped one, especially. That mold is a keeper!
ReplyDeleteOh that heart soap is wonderful WONderful wonderful
ReplyDeleteYour soaps are so pretty, they make me hungry though, isn't that funny? That heart knitting love mold is divine.
ReplyDelete