This is not the post that was intended for today but today is The Mister's birthday so I am going to be occupied elsewhere and Daddio needs all the help he can get while I am away. My sister is coming for a visit to get his help with a new quilt she wants to make for her MIL and his memory is not what it used to be. She reads this blog every morning so this post is written especially for her.
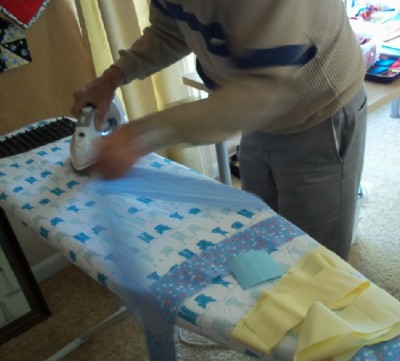
Here he is ironing out the 2 1/2 by 7 inch strips you need to begin. He cuts everything but 2 1/2 by 7 inch strips- so keep an eye on him and remind him often of the correct measurements. I find it helps if you cut the 2 1/2 and he cuts them into the 7 inches.
We spent yesterday making lots of examples with notes to jog Dear Daddio's memory while he is trying to explain what goes where and how it gets there. Notice I put out the 6 1/2 block that is used to square things up. He keeps moving it but here is the proof I put it out where it belongs. I also have an example of how the charm squares should be ironed to make the creased sewing line. Don't let him do them all in advance because the crease doesn't stay sharp enough to see. Don't ask me how I know this.
I even left an example on the sewing machine so you can see what direction the pieces need to go in. I set the machine needle at 1/4 of an inch so if you want to try sewing some pieces together it shouldn't be a problem. I tested out the measurements on this machine several times to make sure it was right. If you can't get the strip block squared off to 6 1/2 you didn't sew right on the foot edge. Rip it out and try again. Don't ask me how I know this either.
All the Sweetgrass Prairie materials were sorted out by how they are to be used.
I also left a note to dig through MY box of stash to find more charm squares. There is 66. You need 72. You should be able to find some that match or come close since I pretty much own one of everything
Connecting Threads has to offer in the charm square department. I am obsessed with them.
We even put an almost finished square on Daddio's design wall so you can see how everything goes together. Notice that the lightest strips make the star in middle so that is why it is so important to make sure that strip is always at the bottom before you pin the charm squares on the corners-lower right and upper left with sewing crease on the diagonal. I left some pretty bad drawings of all this but I also left some done this way so you can see it for yourself. Also remind me to remove that nail that is sticking out through the felt in the photo. It is going to make a hole.

Warning: If anyone gets into the box of materials that is for finishing MY Hope Chest Serendipity, there will be hell to pay so make sure nothing gets mixed up. If things go badly, I will be back there on Sunday to sort it all out. I know Daddio is more than excited to get a sewing day with someone new. He even made me take him out to get a new cover for his ironing board yesterday-so have fun. It's only material and we can get always get more!


.jpg-large)


So that's how you get a quilt done! Have a fun day and best birthday wishes to the Mister.
ReplyDeleteWow
ReplyDeletememories of my quilting with my mom when things were getting tough to remember.
beautiful to see you with your dad.
anne