Yesterday we knit down the leg and today we have to figure out what to do about the heel. Here is where the beauty of the Magic Loop really becomes apparent.
With 3 needles you have to figure out where things such as where the instep and the heel flap go and then you have to readjust your stitches-which for a beginner can be a nightmare.
With the Magic Loop, they are already lined up. The instep, which is the top of the foot is already all on the front needle. The stitches already on the back needle is where you will do
all of your heel shaping. Brilliant.
All of the heel shaping begins with a simple heel flap. Imagine a square continuation of the stitches only on the back needle that is no longer in ribbing. The front needle is now being completely ignored while I knit
back and forth on all the stitches on the back needle to build a square base onto which we will attach more things later.
For now I just knit 24 rows of slip1, knit1 on the front side and purl back on the reverse side-which will be on the
inside of the sock. I always slip the first stitch of each row, even on the purl side. I just count the larger slipped stitches, when I get a length of 12, I am done. Remember, you don't do
anything to the stitches on the other needle.

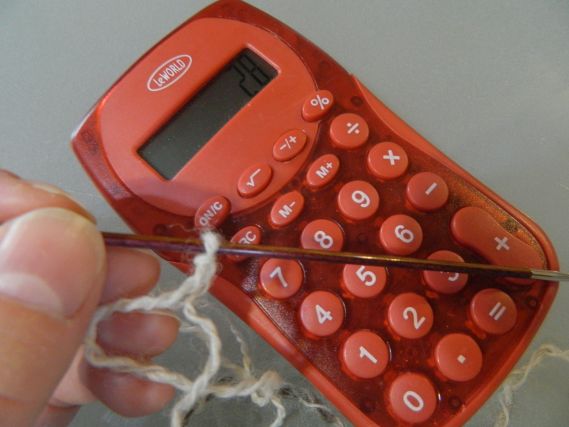
Then comes the fun part. When I have my flap done, I have to build a little round place to put my heel. I do this by using short rows. On the front side of the flap (the outside of the sock), I switch to regular old stockinette stitch which means knit on the front side and purl on the back ( the inside of the sock). I start by knitting to the center of the flap, which is to stitch number 14. Now I knit 2 more. Now I slip one, then knit one and pass the slipped stitch over the knitted one and then I knit 1 more stitch. I turn the work around not worrying a bit about the ones I didn't do. They are not going anywhere. After turning the work, I slip the first stitch, purl 5 more and then purl 2 together and turn the work again. Now there is no more counting. I just knit to the "hole" the turning makes and slip the one in front of it and then I knit the one after it and pass it over and knit one more and turn. Same thing with the purl side. I knit up to the "hole", then I purl the stitch in front of the hole with the one behind the hole together and then I purl 1 more and turn. I keep doing this until there are no more "holes". The heel flap now ends with a rounded top and lots fewer stitches. We have to do something about that.

That flap has to be joined back to the stitches on the front needle that have been sitting there doing nothing. The problem is that I have used up lots of my original stitches and now I have to create a little "patch" on each side to join the front to the back. Those "patches" are called your heel gussets. It is the area I am pointing to that makes a neat little triangle on each side. The triangle comes from decreasing the stitches I am about to pick up.
If you look on each side of the heel flap you will see a nice neat row of stitches made by the stitches I slipped. There should be about 12 give or take a few. Being off a stitch or two here doesn't matter at all. I will be decreasing soon and I will be able to make up the difference.
Now to pick up stitches for the heel gusset, I want to stick my working needle through each slipped stitch and pull up a loop from the yarn in back all the way down the length of the flap. If this is too hard, I use a small crochet hook. I always keep one in my sock bag as some yarns can be tricky to pick up. If I have to add an extra stitch at the end to hide a hole at the join with the instep stitches- I do it. I can decrease it later and no one will know the difference.

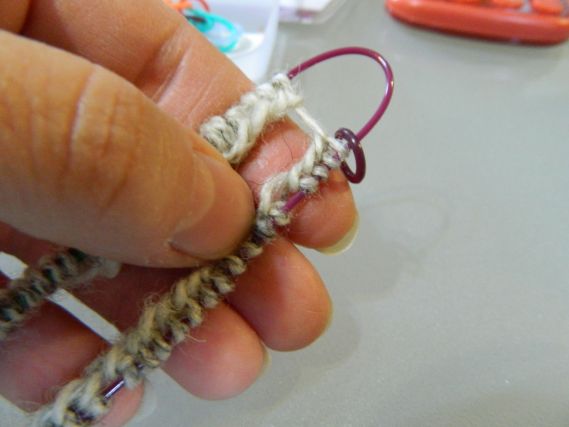
I do this on both sides of the instep by first going down one side. When I come to the end of those picked up stitches I must switch needles again to knit across the instep. The instep must always be knit on its own needle so now I turn the needles to the right and pull out the heel needle. I knit the instep in the same way I did the leg ribbing. I am now going back to knitting around in a circle again-only this time it is the foot I am going around. When I am through with the instep, I switch the needle again by turning the the work to the right and pulling the back one through. Then I pick up the other side of the heel flap like I did the first side. If I did this right, I get way too many stitches on the back needle and all the original instep stitches will still be
on their very own needle in the front of the sock. I can continue in ribbing for the instep or I can choose to switch over to stockinette here if I am tired of ribbing.
The good news is that I am now going to start decreasing most of those picked up stitches-every other row. I knit to 3 stitches before I switch to the instep needle and then decrease by knitting 2 together finishing with a knit 1. I knit across the instep needle and when I start the next side, I knit1 and then decrease again by slipping one and then knitting one and then passing the slipped stitch over the knitted one. As I said before, I do this every other row. When I get back to my original 28 stitches, I stop decreasing and then knit the foot as long as I need it to be. I usually stop when the foot gets to the bottom of my big toe. Another good thing about Magic Loop is that you can try it on at anytime. Just pull it all onto the cables and stick your foot in.
Here is another terrible video of me working my way across the heel, decreasing and then going onto the instep.

When the foot is the right length, I start decreasing again just like I did before BUT this time I do it on both needles. Starting with the instep, I knit 1, slip1, knit 1 then pass the slipped one over. I then knit across to the last 3 stitches and knit 2 together and then finish by knitting one. I decrease the heel needle the same way as I did before. I do this to both needles on every other row. When I get to 28 stitches TOTAL, I start decreasing on EVERY row. That will keep me from getting a pointy toe. When I get down to the last 8 stitches, cut off the yarn leaving a long length, thread it on a big needle and then pull it through the stitches going in the correct order and tighten off. I weave this end in good and tight. I don't want my toes popping through. If you are using a really heavy yarn, you will more than likely want to graft those toes but that is way beyond my abilities here. You Tube it. I do.
Speaking of You Tube,
here is another very good tutorial on the Magic Loop from Knit Picks that is probably a lot more clear than my long winded explanation.
Having said all this, let me say that this is a very, very, very basic tutorial on making socks for beginners. There are about a zillion wonderful variations on everything I have talked about here-enough to keep you pretty busy for the rest of your life.


.jpg-large)